Shopify ecommerce tracking
Here's how to add Plausible Analytics to your Shopify store and set up the tracking of events such as add to cart, checkout, purchase, revenue attribution and more.
Privacy-first analytics for your Shopify store
Add Plausible snippet to Shopify
-
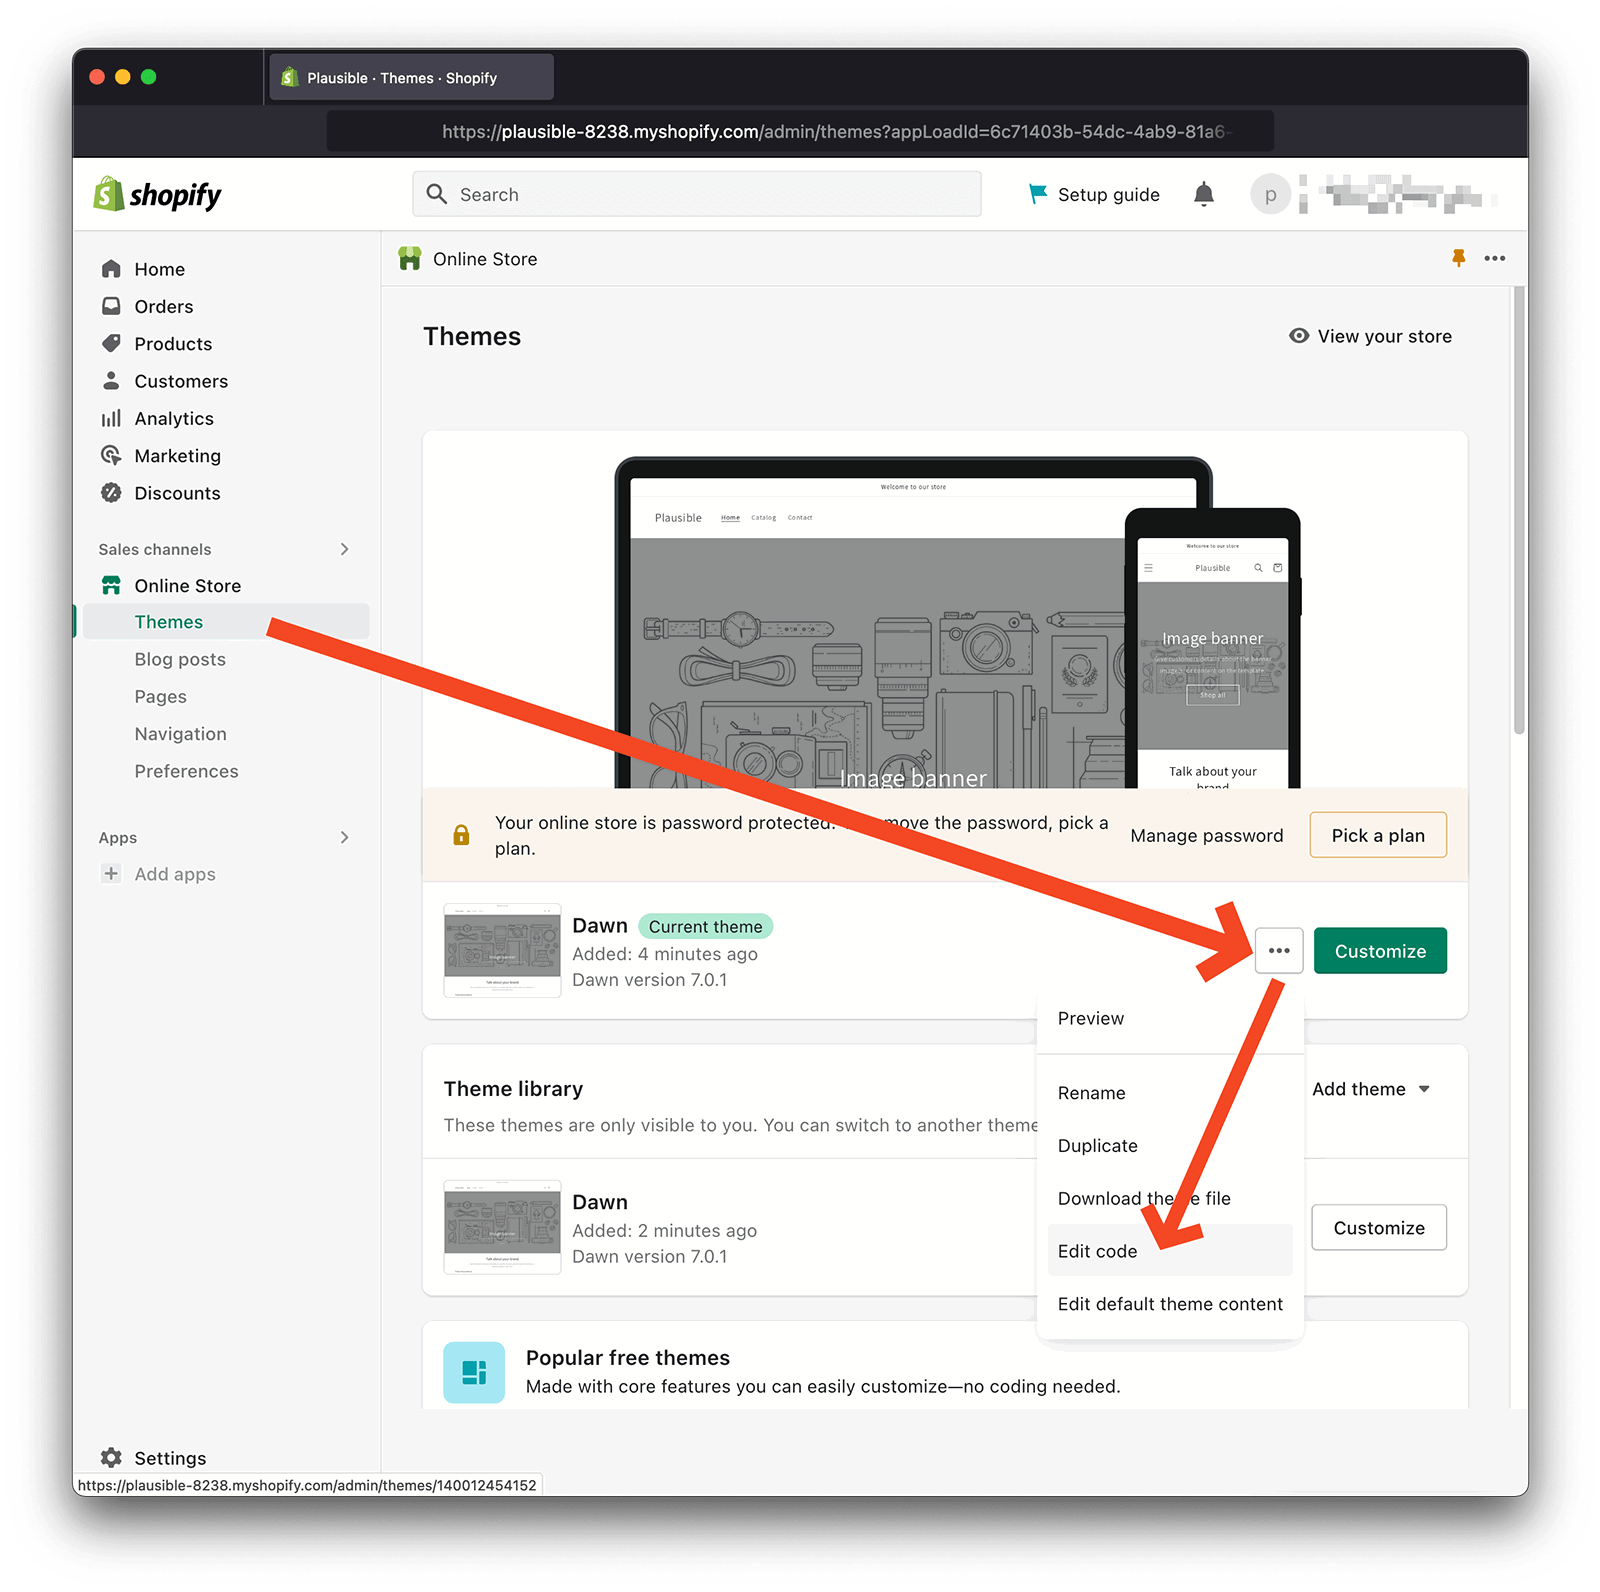
Log in to your Shopify account and click on Sales Channels > Online Store > Themes in the left-hand side menu.
-
Click on the icon with three dots next to your current theme and choose Edit code from the drop-down menu.
-
In the Layout folder, select your theme.liquid file and paste your Plausible snippet in the Head Code section. We display your snippet during the process of adding a new site to your account. You can also see the snippet within the Site Installation area of the General section in your site settings.
-
Do click on the Save Changes to publish your changes.
Track checkouts and revenue attribution
Even after having added the Plausible snippet into your theme.liquid file, checkout pages such as /checkouts/cn/:id/review or /checkouts/cn/:id/thank-you will not be tracked yet. That's because they're not using the same theme layout. To enable pageview tracking on checkout pages, you need to create a custom pixel. The same pixel can also be used for tracking Shopify's customer events (e.g. "product_added_to_cart", "checkout_completed", etc...) with revenue attribution and custom properties.
To create the custom pixel, follow these steps:
- Go to your Shopify admin page
- Click on the Settings button at the bottom left

- Open the Customer events section, and click on Add custom pixel
- Choose a name for your pixel (e.g. Plausible)
- Copy and paste the snippet into the Code block according to your tracking needs as instructed below
- Click Save at the top, then connect the pixel
- That's it - your custom Plausible pixel should now be tracking!
Snippet options for the custom pixel
The code that will end up in your pixel depends on what you want to track. The first code block (Setup block) is required for everything else to work. Everything that follows the Setup block is optional. You can copy and paste the code blocks that you're interested in, one after another.
Setup block [Required]
This snippet is required for everything else that follows, but doesn't track anything by itself. Make sure to replace yourdomain.com on the first line with the name of your site in Plausible.
Note that this snippet should be placed at the top of the code block.
const DATA_DOMAIN = 'yourdomain.com';

const script = document.createElement('script');
script.defer = true;
script.dataset.domain = DATA_DOMAIN;
script.dataset.api = 'https://plausible.io/api/event';
script.src = 'https://plausible.io/js/script.manual.revenue.js';
document.head.appendChild(script);

window.plausible = window.plausible || function() {
  (window.plausible.q = window.plausible.q || []).push(arguments)
}
Track pageviews on checkout pages
Track pageviews on checkout page paths such as:
/checkouts/cn/Z2NwLWV1cm9wZS13ZXN0N//checkouts/cn/Z2NwLWV1cm9wZS13ZXN0N/review/checkouts/cn/Z2NwLWV1cm9wZS13ZXN0N/processing/checkouts/cn/Z2NwLWV1cm9wZS13ZXN0N/thank-you
// Track pageviews on checkout pages
analytics.subscribe('page_viewed', async (event) => {
  const loc = event.context.document.location;

  // This "if" condition makes sure only checkout paths are tracked.
  // The "page_viewed" customer event is also fired for other pages,
  // but those should be tracked by the global snippet installed in
  // the `theme.liquid` file.
  if (loc.pathname.startsWith('/checkouts')) {
    plausible('pageview', {u: loc.href})
  }
});
You can then group all visits to checkout pages into one set of pages in your Plausible dashboard to better analyze your marketing campaigns and performance.
Click on the Filter button on the top right of your dashboard and then choose Page. Here you can combine URLs to analyze them as one group. Filter by "contains" thank_you to combine all the purchase confirmations or by "contains" checkouts to group all the checkouts.
Doing this will segment your dashboard by the traffic that went through the checkout process and successfully placed orders. You'll be able to see the referral sources and landing pages that drove the most conversions. You'll also be able to see the location and device details of the buyers too.
If you'd like to see these grouped order confirmations or checkout page visits permanently in your dashboard, you can add them as pageview goals.
Track started checkouts
Send a custom event called Begin Checkout to Plausible every time the checkout process is started. The total price of the shopping cart will be recorded under this event.
// Track started checkouts
analytics.subscribe('checkout_started', async (event) => {
  const amount = event.data.checkout.totalPrice.amount;
  const currency = event.data.checkout.currencyCode;

  plausible('Begin Checkout', {
    revenue: {amount: amount, currency: currency},
    u: event.context.document.location.href
  })
});
In order to see this information on your Plausible dashboard, you should:
- Set up a revenue goal called
Begin Checkoutwith your desired reporting currency
Track payment info added during checkout
Send a custom event called Add Payment Info to Plausible every time payment information is submitted by a customer during the checkout. The total price of the shopping cart will be recorded under this event.
// Track payment info added during checkout
analytics.subscribe('payment_info_submitted', async (event) => {
  const amount = event.data.checkout.totalPrice.amount;
  const currency = event.data.checkout.currencyCode;

  plausible('Add Payment Info', {
    revenue: {amount: amount, currency: currency},
    u: event.context.document.location.href
  })
});
In order to see this information on your Plausible dashboard, you should:
- Set up a revenue goal called
Add Payment Infowith your desired reporting currency
Track completed checkouts (purchases)
Send a custom event called Purchase to Plausible every time a checkout is completed. The total amount paid by the customer will be recorded under this event.
// Track completed checkouts
analytics.subscribe('checkout_completed', async (event) => {
  const amount = event.data.checkout.totalPrice.amount;
  const currency = event.data.checkout.currencyCode;

  plausible('Purchase', {
    revenue: {amount: amount, currency: currency},
    u: event.context.document.location.href
  })
});
In order to see this information on your Plausible dashboard, you should:
- Set up a revenue goal called
Purchasewith your desired reporting currency
Track "Add to Cart"
Send a custom event Add to Cart to Plausible when an item gets added to the shopping cart. Each Add to Cart event also captures the following information:
productTitle(custom property) - title of the product added to cartquantity(custom property) - number of items added to cart- a revenue value - the price of the product multiplied with quantity
// Track "Add to Cart"
analytics.subscribe('product_added_to_cart', async (event) => {
  plausible('Add to Cart', {
    revenue: {
      amount: event.data.cartLine.cost.totalAmount.amount,
      currency: event.data.cartLine.cost.totalAmount.currencyCode
    },
    props: {
      productTitle: event.data.cartLine.merchandise.product.title,
      quantity: event.data.cartLine.quantity
    },
    u: event.context.document.location.href
  })
});
In order to see this information on your Plausible dashboard, you should:
- Set up a revenue goal called
Add to Cartwith your desired reporting currency - Set up two custom properties called
productTitle, andquantity
Track site searches
Send a custom event called Search to Plausible when a site search is performed. This event also includes a searchQuery custom property, containing the string value that was used for the search.
// Track site searches
analytics.subscribe('search_submitted', async (event) => {
  plausible('Search', {
    props: {searchQuery: event.data.searchResult.query},
    u: event.context.document.location.href
  })
});
In order to see this information on your Plausible dashboard, you should:
- Set up a custom event goal called
Search - Set up a custom property called
searchQuery
Customize your own tracking pixel
Should you need something more specific that's not covered by the tracking snippets we've listed above, even with a tiny bit of coding experience, it's pretty straight forward to implement your own custom tracking pixel.
Simply put, you're working with two APIs (application programming interfaces) - Plausible and Shopify. You just need to plug the right pieces together. The Add to Cart event is a really good and elaborate example, using both revenue attribution and custom properties. Let's see how it works.
analytics.subscribe('product_added_to_cart', async (event) => {
  plausible('Add to Cart', {
    revenue: {
      amount: event.data.cartLine.cost.totalAmount.amount,
      currency: event.data.cartLine.cost.totalAmount.currencyCode
    },
    props: {
      productTitle: event.data.cartLine.merchandise.product.title,
      quantity: event.data.cartLine.quantity
    },
    u: event.context.document.location.href
  })
});
Shopify API - the analytics.subscribe function
This function is built into the pixel. It takes two arguments:
- the name of the customer event in Shopify
- a function that should be executed when that customer event occurs. That function itself also takes an argument (
event) which contains all the context about that customer event.
You can see the full list of Shopify's customer events here. When clicking on any of those, you will have an overview of what the event context includes. From those fields you can get the information to send to Plausible.
Plausible API - the plausible function
This function sends events to Plausible. It is initialized within the setup block (see above). Therefore, make sure to also grab that code when implementing your custom pixel, otherwise the plausible function won't be available.
The plausible function takes two arguments:
- an event name which can be whatever you like - just make sure to set up a goal with the same name to see it on your dashboard.
- an object where a few options can be passed:
- [Object]
revenue- allows you to attribute a monetary value to your Plausible event. The object needs to contain two keys:amountandcurrency. Note that you can only attribute a single monetary value to one event. The revenue option is ignored until you've set up a revenue goal in your Plausible dashboard. That's because currency conversion into your desired reporting currency happens at the time of receiving the event. - [Object]
props- here you can pass any value under any key you'd like. The key you choose will become the name of the custom property that you need to configure in your site settings. Note that you are responsible for ensuring that no personally identifiable information is tracked. - [String]
u- this field stands for theurlof the page where this customer event happened. You will most likely want to just keep it the same as in the example. It's important to always pass this option because otherwise the url will become the location of the pixel which has nothing to do with the real location where the event happened.
How to track form submissions and button clicks on Shopify
Here's how you can track particular form submissions and button clicks on your Shopify site:
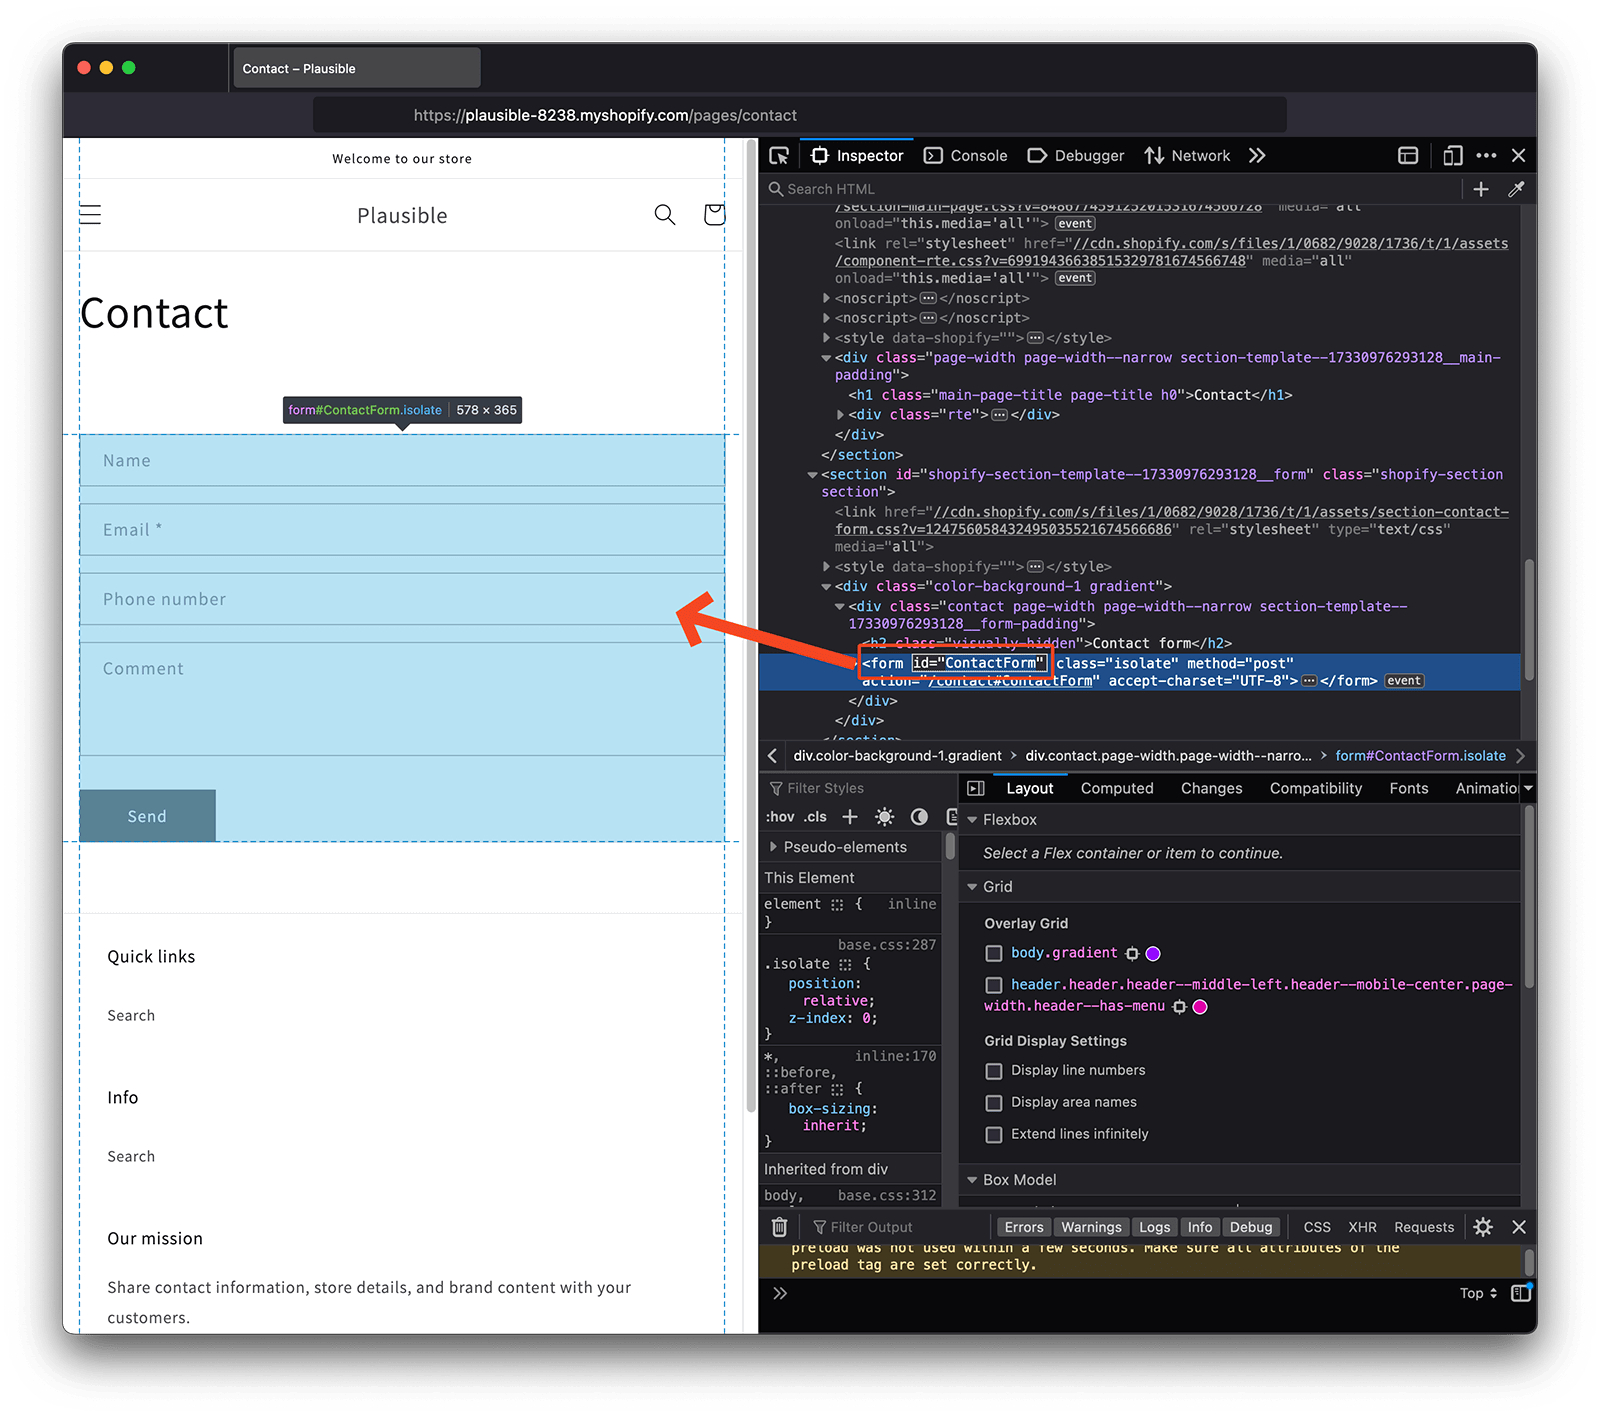
1. Find the ID attribute of the form or button you want to track
Your form or button element should have an ID attribute assigned by default. You can find this ID by selecting the element you want to track (do make sure you select your form element and not just the "Submit" button) and clicking on the settings gear.
2. Trigger custom events with JavaScript on your site
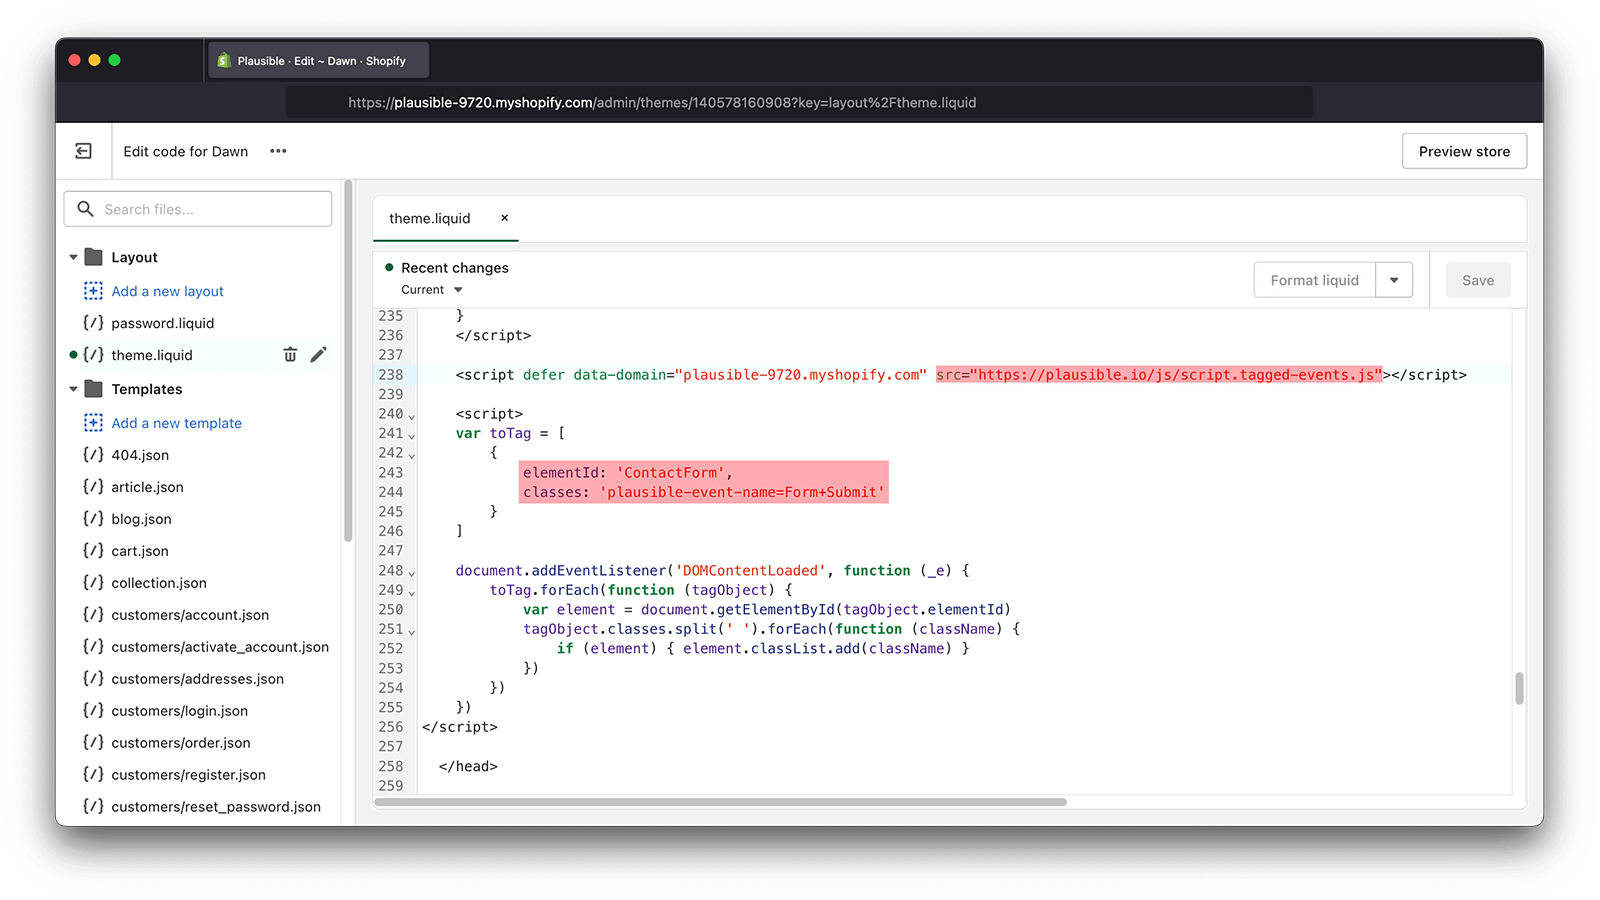
Here's the code you will need to insert in the <head> section of the page where the element ID that you want to track is located. You can do this the same way as you've inserted the Plausible snippet into your site.
Make sure to change the elementId line in the code below to include the ID attribute of the element you want to track (ContactForm in our example).
Also do change the classes line to include the goal name in this format: plausible-event-name=Goal+Name. The goal name is completely up to you. It's the name under which the goal conversions will appear in your Plausible dashboard. We've used Form+Submit goal name in our example.
To represent a space character in goal names, you can use a + sign. For example: plausible-event-name=Form+Submit will display as Form Submit in your Plausible dashboard
<script>
    var toTag = [
        {
            elementId: 'ContactForm',
            classes: 'plausible-event-name=Form+Submit'
        }
    ]

    document.addEventListener('DOMContentLoaded', function (_e) {
        toTag.forEach(function (tagObject) {
            var element = document.getElementById(tagObject.elementId)
            tagObject.classes.split(' ').forEach(function (className) {
                if (element) { element.classList.add(className) }
            })
        })
    })
</script>
Do click on the Save button to save your changes.
3. Create a custom event goal in your Plausible account
When you send custom events to Plausible, they won't show up in your dashboard automatically. You'll have to configure the goal for the conversion numbers to show up.
To configure a goal, go to your website's settings in your Plausible account and visit the Goals section. You should see an empty list with a prompt to add a goal.
Click on the + Add goal button to go to the goal creation form. Select Custom event as the goal trigger and enter the name of the custom event you are triggering. The name must be an exact match to the one you added to your site for the conversions to show up in your dashboard.
So in our example where we added a goal name plausible-event-name=Form+Submit to the Shopify site, the goal to add in the Plausible account is Form Submit (plus is replaced by a space).
Next, click on the Add goal button and you'll be taken back to the Goals page.
4. Your goal should now be ready and tracking
Your goal should now be set up. When you navigate back to your Plausible Analytics dashboard, you should see the number of visitors who triggered the custom event. Goals are listed at the bottom of your dashboard. The goal will show up in your dashboard as soon as it has been completed at least once.
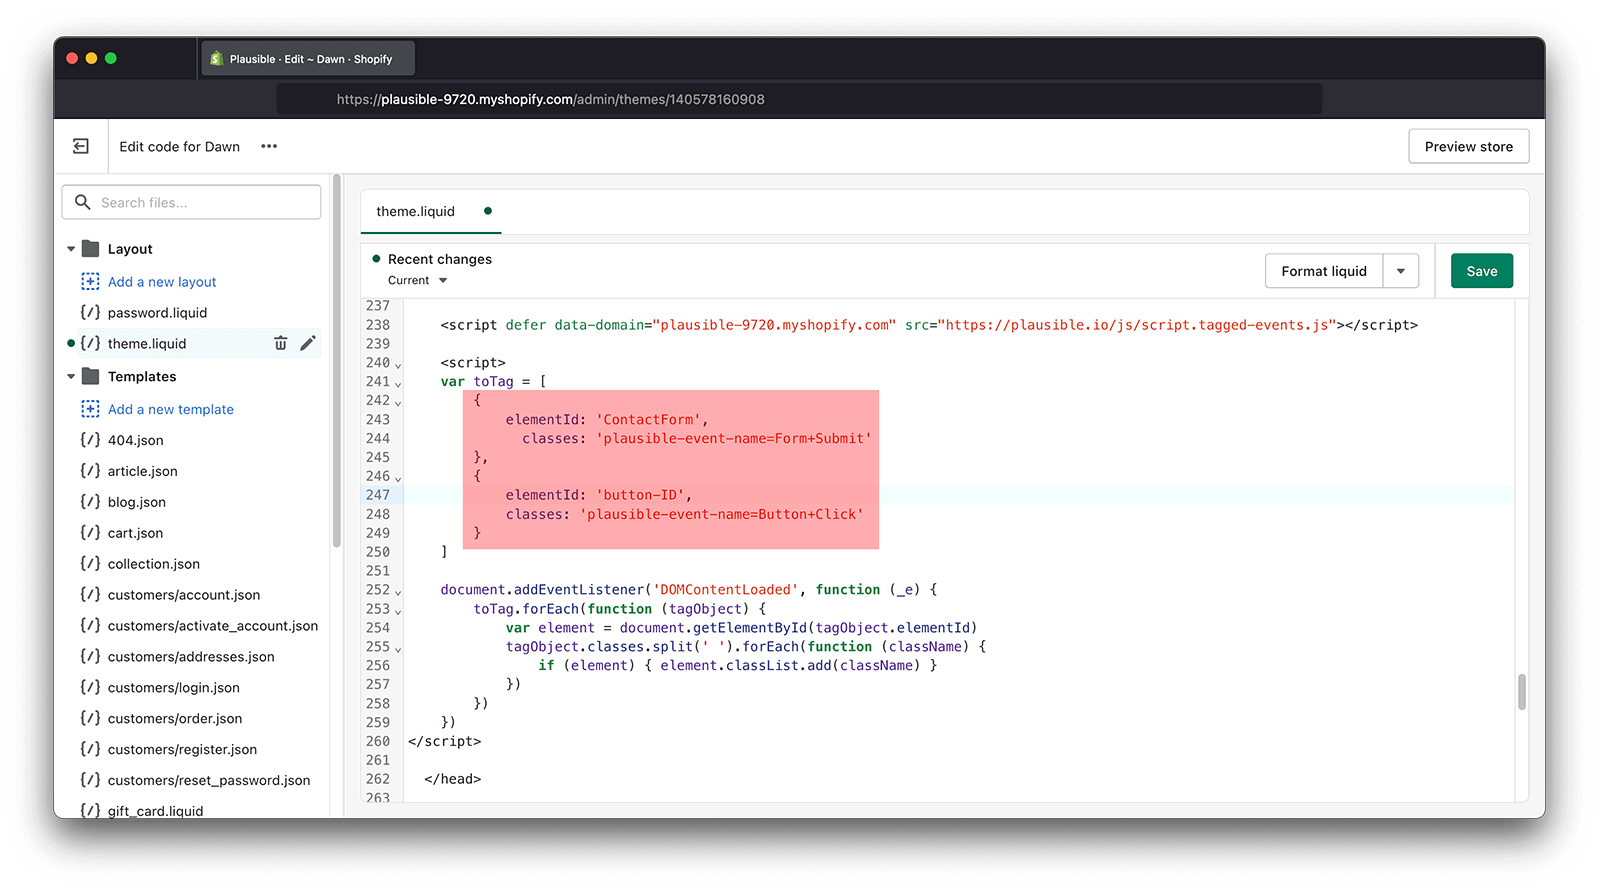
How to trigger multiple custom events on the same page
If you want to trigger multiple custom events on the same site, you don't need to add the script for each element that you want to track. Simply add all the elements in the same code. Make sure to only add the elements that already exist on your site. For example, if you want to track a form and a button, the code will look like this:
<script>
    var toTag = [
        {
            elementId: 'ContactForm',
            classes: 'plausible-event-name=Form+Submit'
        },
		{
      		elementId: 'button-ID',
            classes: 'plausible-event-name=Button+Click'
   		}
    ]

    document.addEventListener('DOMContentLoaded', function (_e) {
        toTag.forEach(function (tagObject) {
            var element = document.getElementById(tagObject.elementId)
            tagObject.classes.split(' ').forEach(function (className) {
                if (element) { element.classList.add(className) }
            })
        })
    })
</script>
What's next?
- Create goals in your Plausible site settings to match the custom events you set up. They won't appear in your dashboard until you do
- Add revenue tracking to your checkout events to see revenue attribution per source and campaign
- Build a funnel from product page to checkout to order confirmation to find where visitors drop off
- Invite your team so colleagues can access the dashboard directly